
Table of Contents
Whether you recently switched payroll providers or your starting fresh with your very first payroll software, there are a few things to know about setting up payroll for small business.
While the process of setting up a new payroll account generally pretty straightforward, mistakes are far more common than you think and some can be tricky to change after the fact. Therefore, the key to a successful payroll setup is attention to detail from start to finish.
In order to make sure you have all the information you need before you start plugging things into the new system, we’ve broken down the process for you. We’ve even put together a handy pre-implementation checklist that covers all the information you need to set up your business details and your employees.
Need more information? Check Out: “Setting Up Payroll: The Ultimate Guide”
A Payroll Setup Checklist
Before you even open up your new payroll account, it’s important to make sure that you have the following on hand:
Business Information:
🗹 Business Address
🗹 Business Number and CRA Payroll Account Number
🗹 Tax Rates and Remittance Schedules
🗹 Business Bank Account Details
🗹 YTD Amounts for All Employees
🗹 ROEs Issued to Date
🗹 Workers Compensation Information (WCB/WSIB)
Employee Information:
🗹 Full Name
🗹 Date of Birth
🗹 SIN
🗹 Bank Deposit Information (for Direct Deposit)
🗹 Home Address
🗹 Email Address
🗹 TD1s
This checklist covers all the basic information you’ll need to set up your company and to start adding employees to your new payroll system. However, this checklist is not exhaustive. Depending on your business and the type of employees you hire, you may need additional information.
Setting Up Your Company Details
With all the necessary information in front of you, the first step is to set up your company details on your new payroll platform. Below, we break down each step:
Business Address
Starting things off on an easy note, the first part of setting up your company details is adding your business address. You’ll need to know the street number, street name, city, province, postal code, and phone number associated with the address. If your company has multiple locations, you may want to use your headquarters as the main address.
Business Number and CRA Payroll Account Number
While your business address is the easy part, here’s where things start to get a little bit more complicated. The next step in setting up your company details is entering your Business Number (BN) and CRA Payroll Account Number. A BN is a unique nine-digit number that the CRA assigns to your business as a tax ID. Not every business needs a BN, but if you’re hiring employees, you’ll need to get one.
Luckily, registering for a BN is fairly straightforward and the CRA allows you to complete the process online, by mail, by fax, or over the phone.
While setting up your BN, you can also register for one or more of the five main CRA program accounts: corporate income tax, GST/HST, payroll deductions, import-export, and registered charity.
Your BN is also part of a CRA Payroll Account Number, which is made up of the following:
- A 9-digit BN to identify the business
- A 2-letter program identifier code to denote the CRA program account (RP for payroll)
- A 4-digit reference number that identifies an individual CRA program account
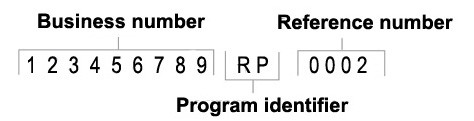
Your new payroll provider will ask you to enter your CRA Payroll Account Number as part of the setup process. This payroll account is the account to which the source deductions are remitted based on your remittance schedule—something that’s very important when it comes to payroll compliance.
Remittance Schedule
After entering your BN and Payroll Account Number, the next step is to enter your Remittance Schedule. If we just lost you, don’t panic. Figuring out what type of remitter you are is easier than you think.
Your remitter type is based on your average monthly withholding amount (AMWA), from two calendar years ago (or from one month ago if you are a new employer). Your AMWA is the total of all the Canada Pension Plan (CPP), employment insurance (EI), and income tax you had to remit for the year, divided by the number of months (maximum 12) that you had to remit for. The CRA reviews your remitter type each year and will notify you if your remitter type changes.
Quarterly Remitters: New Small Employers
If you’re a new small employer, you may be able to remit quarterly instead of monthly. To qualify for quarterly remittances, you simply have to meet both of the following qualifications:
- Each month, your monthly withholding amount (MWA) must be less than $1,000
- You must maintain a perfect compliance history on all your GST/HST (RT) and payroll (RP) program accounts
Quarterly Remitters: Small Employers
Even if you’re not a new employer, you may still be able to remit quarterly instead of monthly if you meet both of the following qualifications:
- An AMWA of less than $3,000 either one or two calendar years ago
- Perfect compliance history
Regular Remitters:
You are a regular remitter if you satisfy the following qualifications:
- You are a new employer, but do not qualify as a quarterly remitter
- Your AMWA two years ago was less than $25,000, and the CRA has not advised you to remit at a different frequency
Threshold 1 Accelerated Remitters
You may also fall into one of two groups of accelerated remitters.
You are a threshold 1 accelerated remitter if you had a AMWA of $25,000 to $99,999.99 two calendar years ago.
Threshold 2 Accelerated Remitters
You are a threshold 2 accelerated remitter if you had a AMWA of $100,000 or more two calendar years ago.
Most businesses will be non-accelerated remitters, but you should always double-check before you enter your information because there are significant penalties for those who provide the wrong threshold information.
Bank Account
While your business address and BN are important parts of the setup process, your bank account details are especially crucial. That’s because if your baking information isn’t correct, it’s going to be pretty hard to pay your employees.
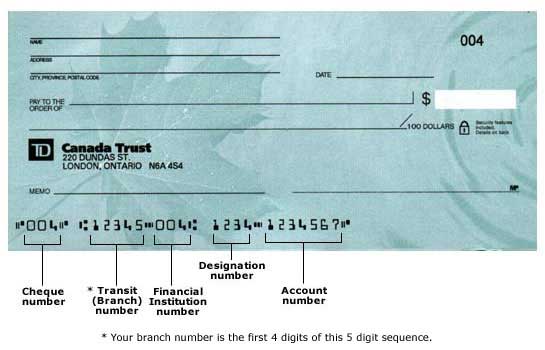
When setting up your banking details, it’s best to have a cheque on hand to complete the following:
- Bank name
- Transit number
- Account number
Once you’ve entered your banking information, your payroll provider will need to ensure that the information is correct. Each provider has its own way of verifying this information. For example, Knit automates and simplifies this process by sending a micro deposit to the account you have entered. You will then need to enter the exact micro deposit amounts you received to complete the verification process.
Setting Up Your Employees
With your company fully set up, it’s time to start adding your employees to your new payroll system. With most payroll systems, this should be fairly straightforward.
Employee Details
You will need to enter the following information for each employee:
- First and Last Name: this information should match the name on their bank account details.
- Birthdate: note that employees below 18 years of age are exempt from contributions toward the Canada Pension Plan (CPP).
- Home Address: this information will be displayed on their paystub and year-end report (ie. T4).
- Province of Employment: in most cases, the employee will live in the same province in which they work. If the employee does live in a different province than the one in which they work, ensure that the correct information is entered into the system.
- SIN: you should request each new employee's SIN within three days of the day on which their employment begins.
- Email: an email address will allow the employee to access online employee portals and receive email notifications when paystubs are available.
- Hire Date: select the first day that an employee began working at the company.
- Federal and Provincial/Territorial TD1 Forms: used to determine the amount of tax to be deducted from an individual's employment income or other income, such as pension income.
- Pay Group: assign the payroll frequency with which the employee will be paid.
- Pay Rate: enter the employee’s gross rate of pay.
- Pay Type: specify whether the employee is paid an hourly rate or an annual salary.
Note that if you are setting up an independent contractor instead of an employee, you may need some additional information, such as the CRA Number (if the contractor is associated with a business).
Employee Direct Deposit
In addition to all the basic employee details, you’ll also need to set up your employee’s bank account information to ensure that they’re able to receive direct deposit. In order to set up direct deposit, you’ll need the following banking details for each employee:
- Bank Name: enter the name of the bank that the account is associated with.
- Account Number: enter the 5-17 digit account number associated with the employee's bank account.
- Branch Number: enter the branch or transit number associated with the employee's bank account.
- Account Type: indicate if the bank account is a chequing or savings account.
Some payroll providers allow employees to deposit their pay into multiple accounts. For instance, employees may choose to allocate a portion of their pay to savings, and a portion to their chequing account. If your payroll provider offers this option, you may have to indicate the order in which the deposits are processed and the amount allocated to each account.
Setting up your company details and employee profiles can become a bit tedious, which is why some payroll providers have a mass-import feature. Mass-importing allows you to upload your employee details in batches, saving you more time on data entry. Alternatively, payroll platforms such as Knit have a self-onboarding feature that allows employees to fill out their own details—a feature that means even less work for the administrator.
At the end of the day, setting up payroll for small business should be as simple and straightforward as possible. If any issues crop up, your new provider should be able to provide the support needed to get you up and running.


.svg)
.svg)
.svg)
.svg)
.svg)